You are using an out of date browser. It may not display this or other websites correctly.
You should upgrade or use an alternative browser.
You should upgrade or use an alternative browser.
Number plate lights
- Thread starter hadi
- Start date
simes2024
A2OC Donor
Was hoping someone had responded with some info. Both mine and my neighbour have at last one broken screw and the others are rusted to b****ry and likely to break. Surely this is an increasingly common issue the older they are getting.
New replacement kits can be ordered from Germany but I imagine its a time-consuming job
New replacement kits can be ordered from Germany but I imagine its a time-consuming job
steve_c
Grumpy OAP & A2OC Donor
New kits are still available here, from this seller at least:
 www.carparts4less.co.uk
£31 for the two units. Make sure you fit them with stainless screws!
VM Licence Plate Light | Car Parts 4 Less
VM Licence Plate Light at the lowest UK prices from Car Parts 4 Less UK’s No.1 for Car Accessories, Car Styling & Car Care. Buy today Online, In store or by Phone + Branches Nationwide – Next Day UK Free Delivery.
£31 for the two units. Make sure you fit them with stainless screws!
PlasticMac
Member
Anyone know screw size please?New kits are still available here, from this seller at least:
VM Licence Plate Light | Car Parts 4 Less
VM Licence Plate Light at the lowest UK prices from Car Parts 4 Less UK’s No.1 for Car Accessories, Car Styling & Car Care. Buy today Online, In store or by Phone + Branches Nationwide – Next Day UK Free Delivery.
£31 for the two units. Make sure you fit them with stainless screws!
I'd like to have them handy before I try to remove the old ones.
Mac
Why bother, just clean up and use stainless screws? The problem is removing existing rusty screws. I would try removing them as a full strip down is no quick job. Usual techniques, drill/mole grips/screw extractor?I'm planning on replacing the lights with better ones that involve doing away with the screw on clear part and connecting new light to the contacts in the housing , does anyone know what size of spade connector will slip onto the connectors ?
Andy
steve_c
Grumpy OAP & A2OC Donor
@Pinkythelabrat suggests Halfords HFX580Anyone know screw size please?
Replacement alloy screws for number plate lights?
Timmus mentioned to me earlier this week on possible number plate screw replacements from screwfix that won't rot and disintegrate in 10 minutes as over supplied oem screws. Can't find the thread anywhere does anyone know or have the thread bookmarked..thanks
www.a2oc.net
Anyone know screw size please?
I'd like to have them handy before I try to remove the old ones.
Mac
turn signal indicator Audi A2 (A2) 2002 year Audi EUROPA 945060
turn signal indicator Audi A2 (A2) 2002 year Audi EUROPA 945060 spare parts
Andy
steve_c
Grumpy OAP & A2OC Donor
turn signal indicator Audi A2 (A2) 2002 year Audi EUROPA 945060
turn signal indicator Audi A2 (A2) 2002 year Audi EUROPA 945060 spare partsaudi.7zap.com
If only that unusual size were available in stainless! You just need to find something close.
JM_A2
Member
I very recently managed to extract my old rusty snapped screws while still keeping the number plate lights in place. like you, I didn't want to remove the tailgate trim to replace the whole units as it didn't seem like an easy job. I have photos of how I did it. I'm happy to provide a write up this evening if it would be any use to you.Why bother, just clean up and use stainless screws? The problem is removing existing rusty screws. I would try removing them as a full strip down is no quick job. Usual techniques, drill/mole grips/screw extractor?
Andy
I've raised this before, this odd size of 4.2mm is actually Imperial screw size No 8!!!!!! Try thisIf only that unusual size were available in stainless! You just need to find something close.

STAINLESS STEEL SCREWS Pan Pozi Drive Self Tapping Sizes 4 6 8 10 | eBay
Find many great new & used options and get the best deals for STAINLESS STEEL SCREWS Pan Pozi Drive Self Tapping Sizes 4 6 8 10 at the best online prices at eBay! Free delivery for many products.
www.ebay.co.uk
Probably other cheaper vendors, this was the first that came up.
Andy
Last edited:
steve_c
Grumpy OAP & A2OC Donor
I've raised this before, this odd size of 4.2mm is actually Imperial screw size No 8!!!!!! Try this
STAINLESS STEEL SCREWS Pan Pozi Drive Self Tapping Sizes 4 6 8 10 | eBay
Find many great new & used options and get the best deals for STAINLESS STEEL SCREWS Pan Pozi Drive Self Tapping Sizes 4 6 8 10 at the best online prices at eBay! Free delivery for many products.www.ebay.co.uk
Probably other cheaper vendors, this was the first that came up.
Thanks for that. Here's another listing where the screws are not only the correct size, but also the correct length (and considerably cheaper too):

No2,4,6,8,10,12,14 Stainless Steel Pan Pozi Self Tapping Screws Pick Your Size | eBay
Stainless Pan Pozi Self Tapping Screws. A2 Stainless Steel,Pozi Drive,Pan Head. No.12 5.5mm 1 3/4" 45mm 27/64" 10.8mm 5/32" 3.95mm. No.12 5.5mm 2" 50mm 27/64" 10.8mm 5/32" 3.95mm. No.12 5.5mm 1 1/2" 38mm 27/64" 10.8mm 5/32" 3.95mm.
www.ebay.co.uk
I would be interested in a write up, thanks.I very recently managed to extract my old rusty snapped screws while still keeping the number plate lights in place. like you, I didn't want to remove the tailgate trim to replace the whole units as it didn't seem like an easy job. I have photos of how I did it. I'm happy to provide a write up this evening if it would be any use to you.
Andy
Joga
A2OC Donor
I also recall this thread concerning good stainless screws for this purpose:
Stainless screws for rear number plate lights
Most have encountered rusty screws for the lens of the rear number plate lights (or will!). Here is a my replacement light. These are the dimension of the original screws. Approx 3.75mm x 14mm. I found that this stainless screw was a good replacement:
www.a2oc.net
simes2024
A2OC Donor
Yes true and will consider. The lenses/bulbs are intact so only need screws really. (drilling out was my first thought as they have all rusted and rounded) Not yet fully investigated but I have a feeling the tailgate trim may have to come offWhy bother, just clean up and use stainless screws? The problem is removing existing rusty screws. I would try removing them as a full strip down is no quick job. Usual techniques, drill/mole grips/screw extractor?
Andy
simes2024
A2OC Donor
Ditto taI would be interested in a write up, thanks.
Andy
JM_A2
Member
Alright, as requested:
First image shows you what I started with.

The screws were very rusty on my number plate lights. Initially i tried to unscrew them but they were far too rotten and instantly rounded off. I then tried to drill out the screws using a screw extracting tool, however this was not successful. Although the screw did not come out this did create a nice centre for us to drill off the head of the screw with a 3.5mm drill. Having done that twice you can then remove the plastic lense. The heads came off the screws leaving just the threaded rods poking out. I tried to grab onto what was left of the screw and wind them out using some mole grips but the screw just snapped further up leaving nothing sticking out. I then decided to take off the trim on the inside of the boot to see if it was an easy job to remove the entire number plate light assembly. I realised you need to take off the lower section of the boot (the bit the number plate sits on) in order to remove the entire light unit.
Due to the state of the screws needed to remove the lower portion of the tailgate trim, I decided it would be easier to keep the existing number plate lights in place and focus on removing the screws.

Pictured either side of the boot release handle are the screws you would need to take out as part of the boot trim removal process. I have included this photo as because of the corrosion on these screws, removing the lower trim on the boot would have quite possibly been more of a hassle then the fix I am describing here.
To remove the rest of the screw that was stuck in the light unit, i started by cutting off the plastic stub which the screw goes into which is assessable from the inside of the boot.

In order to cut the stub off, I used a JR hacksaw blade. To make an easier time of it I removed the pin from the end of the saw blade so it didn't get stuck on the light when sawing. See image below for further detail.

As the end of the screw partially sticks up into the plastic stub, i sawed around the metal bit as much as i could and then stuck a chisel in the gap that was left and levered off the rest of the stub.

pictured above is what i was then left with.
This next step really requires two people. I used a soldering iron to heat up the exposed inner end of the screw. The idea being that the heat travels down the screw and melts the surrounding plastic without cooking the entire light.

After holding the soldering iron in place for 3-4 minutes the screw should be about hot enough to break through. One thing to look for that might indicate the area is hot enough is the matt plastic goes shiny around the screw. At this point you want a helper to use something with a fine point with a flat end. I used a 2mm pin punch and that did the job well enough. When the screw is hot enough, apply pressure to the outside end of the screw and hopefully it should slide out of the number plate light, leaving you with a hole in the unit. One thing I noted when doing this is the plastic really needs to be hot enough in order for the screw to come out. When pushing on the screw no matter how hard you push, the screw wont come out, when the plastic is hot enough the screw comes out with minimal resistance. We used a fully gassed Dremel soldering iron on max heat in order to get the screw to a suitable temperature. When pushing the screw out, be sure not to press too hard as you risk breaking the unit. If the screw doesn't come out relatively easily, apply more heat.

This is the outside end of the screw being pushed through the light unit.
Once I got all the screws out I then drilled through each of the holes in order to clean them up. I used a 3.5mm drill bit.

Pictured above is what I used as a replacement screw for the light. As numerous other have suggested, i used stainless steel screws so that i don't have the same problem again. The screws are bigger then what comes out originally so that they still wind into the housing for a secure fit. The heads are small enough to fit in the recess of the lense. The lense will require minor adaptation for the screw to fit. I drilled my lenses out with a 4mm step drill which was the right size. You could equally use a file to achieve the same result.
When replacing the lights I chose to buy two new lights so I could fit the new lenses that came with them. If you are using the lenses that came off your light then they may well be brittle and not respond well to being drilled, to lower the chance of breaking them I would gently file them with a round needle file.
Having done all this you can now refit the lenses. When putting in the new screws there will be some resistance as it cuts a new thread. Be careful not to overtighten so that nothing breaks. After all this my lights were a secure fit and are now fully working. It might be easier to screw the screws in separately from the lenses so that once you go to fit the lense the screw winds in easily.
All in all it took me about 1/2 hour for each hole. Developing the method wasn't the work of a minute, I tried lots of ideas using lights I have taken off an A2 from the local scrap yard. I arrived at doing this as I tried various other ways to solve the problem and this was the best solution I could come up with. I used this method to remove all four screws on my car as they were all unable to be removed with a screwdriver. I got the same result each time.
I hope this is of help to someone. Good luck if you feel like taking it on!
First image shows you what I started with.
The screws were very rusty on my number plate lights. Initially i tried to unscrew them but they were far too rotten and instantly rounded off. I then tried to drill out the screws using a screw extracting tool, however this was not successful. Although the screw did not come out this did create a nice centre for us to drill off the head of the screw with a 3.5mm drill. Having done that twice you can then remove the plastic lense. The heads came off the screws leaving just the threaded rods poking out. I tried to grab onto what was left of the screw and wind them out using some mole grips but the screw just snapped further up leaving nothing sticking out. I then decided to take off the trim on the inside of the boot to see if it was an easy job to remove the entire number plate light assembly. I realised you need to take off the lower section of the boot (the bit the number plate sits on) in order to remove the entire light unit.
Due to the state of the screws needed to remove the lower portion of the tailgate trim, I decided it would be easier to keep the existing number plate lights in place and focus on removing the screws.
Pictured either side of the boot release handle are the screws you would need to take out as part of the boot trim removal process. I have included this photo as because of the corrosion on these screws, removing the lower trim on the boot would have quite possibly been more of a hassle then the fix I am describing here.
To remove the rest of the screw that was stuck in the light unit, i started by cutting off the plastic stub which the screw goes into which is assessable from the inside of the boot.
In order to cut the stub off, I used a JR hacksaw blade. To make an easier time of it I removed the pin from the end of the saw blade so it didn't get stuck on the light when sawing. See image below for further detail.
As the end of the screw partially sticks up into the plastic stub, i sawed around the metal bit as much as i could and then stuck a chisel in the gap that was left and levered off the rest of the stub.
pictured above is what i was then left with.
This next step really requires two people. I used a soldering iron to heat up the exposed inner end of the screw. The idea being that the heat travels down the screw and melts the surrounding plastic without cooking the entire light.
After holding the soldering iron in place for 3-4 minutes the screw should be about hot enough to break through. One thing to look for that might indicate the area is hot enough is the matt plastic goes shiny around the screw. At this point you want a helper to use something with a fine point with a flat end. I used a 2mm pin punch and that did the job well enough. When the screw is hot enough, apply pressure to the outside end of the screw and hopefully it should slide out of the number plate light, leaving you with a hole in the unit. One thing I noted when doing this is the plastic really needs to be hot enough in order for the screw to come out. When pushing on the screw no matter how hard you push, the screw wont come out, when the plastic is hot enough the screw comes out with minimal resistance. We used a fully gassed Dremel soldering iron on max heat in order to get the screw to a suitable temperature. When pushing the screw out, be sure not to press too hard as you risk breaking the unit. If the screw doesn't come out relatively easily, apply more heat.
This is the outside end of the screw being pushed through the light unit.
Once I got all the screws out I then drilled through each of the holes in order to clean them up. I used a 3.5mm drill bit.
Pictured above is what I used as a replacement screw for the light. As numerous other have suggested, i used stainless steel screws so that i don't have the same problem again. The screws are bigger then what comes out originally so that they still wind into the housing for a secure fit. The heads are small enough to fit in the recess of the lense. The lense will require minor adaptation for the screw to fit. I drilled my lenses out with a 4mm step drill which was the right size. You could equally use a file to achieve the same result.
When replacing the lights I chose to buy two new lights so I could fit the new lenses that came with them. If you are using the lenses that came off your light then they may well be brittle and not respond well to being drilled, to lower the chance of breaking them I would gently file them with a round needle file.
Having done all this you can now refit the lenses. When putting in the new screws there will be some resistance as it cuts a new thread. Be careful not to overtighten so that nothing breaks. After all this my lights were a secure fit and are now fully working. It might be easier to screw the screws in separately from the lenses so that once you go to fit the lense the screw winds in easily.
All in all it took me about 1/2 hour for each hole. Developing the method wasn't the work of a minute, I tried lots of ideas using lights I have taken off an A2 from the local scrap yard. I arrived at doing this as I tried various other ways to solve the problem and this was the best solution I could come up with. I used this method to remove all four screws on my car as they were all unable to be removed with a screwdriver. I got the same result each time.
I hope this is of help to someone. Good luck if you feel like taking it on!
Last edited:
JM_A2
Member
Just for some extra credit, here is how my ones turned out.

No rusty screws in sight!
I decided to replace the original bulbs with some LEDs while doing this job.
If you are using LED bulbs be sure not to short the light on the clips that the LEDs mount into. Initially I was disappointed to find that my lights didn't work and it turned out I had a short circuit and had blown a fuse. After adjusting the LED and replacing the fuse everything worked as it should.
I though I should add a few links for some of the parts I used.
Both the screws and the screw extractors were from screwfix.
Screw extractors:
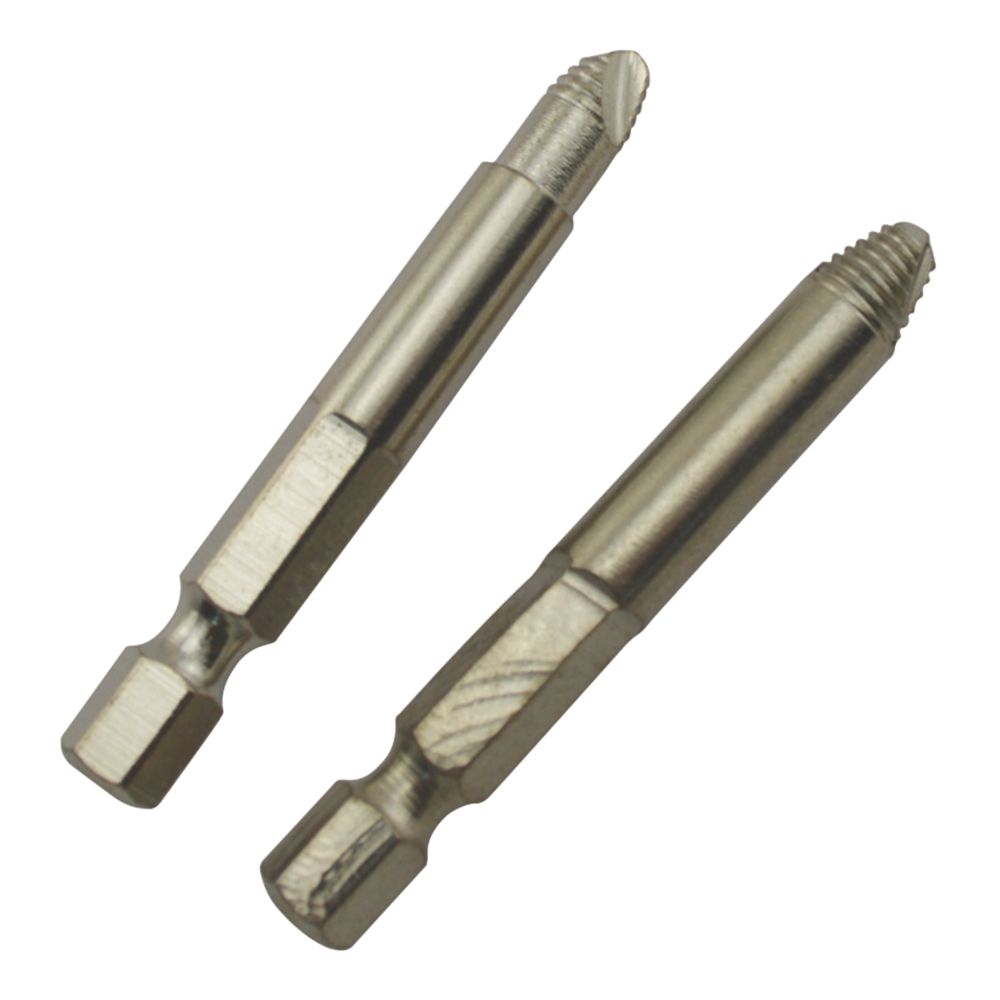
 www.screwfix.com
Screws:
www.screwfix.com
Screws:
 www.screwfix.com
The replacement number plate lights I got so I could have lenses from them have been linked previously in this thread but I'll link them again here as well.
www.screwfix.com
The replacement number plate lights I got so I could have lenses from them have been linked previously in this thread but I'll link them again here as well.
www.carparts4less.co.uk
No rusty screws in sight!
I decided to replace the original bulbs with some LEDs while doing this job.
If you are using LED bulbs be sure not to short the light on the clips that the LEDs mount into. Initially I was disappointed to find that my lights didn't work and it turned out I had a short circuit and had blown a fuse. After adjusting the LED and replacing the fuse everything worked as it should.
I though I should add a few links for some of the parts I used.
Both the screws and the screw extractors were from screwfix.
Screw extractors:
Screw & Bolt Extractor Set 2 Pieces - Screwfix
Order online at Screwfix.com. Easily removes broken screws and bolts. FREE next day delivery available, free collection in 1 minute.
Easydrive PZ Pan Self-Tapping Screws 8ga x 3/4" 100 Pack - Screwfix
Order online at Screwfix.com. A2 grade stainless steel. FREE next day delivery available, free collection in 1 minute.
VM Licence Plate Light | Car Parts 4 Less
VM Licence Plate Light at the lowest UK prices from Car Parts 4 Less UK’s No.1 for Car Accessories, Car Styling & Car Care. Buy today Online, In store or by Phone + Branches Nationwide – Next Day UK Free Delivery.
Last edited:
steve_c
Grumpy OAP & A2OC Donor
I've raised this before, this odd size of 4.2mm is actually Imperial screw size No 8!!!!!! Try this
Unfortunately the screws that Audi supply are not Imperial screw size 8, despite what gets listed. Size 8 won't fit into a new light unit since it is too big (and even if it would screw in without damage, it's a bit short at 13mm)
I'm dropping a size to Imperial screw size 6, and increasing the length slightly to 16mm with my next order.
Joga
A2OC Donor
Yepp, 3.5x16 is what I went for too. (as per my link earlier in this thread.)Unfortunately the screws that Audi supply are not Imperial screw size 8, despite what gets listed. Size 8 won't fit into a new light unit since it is too big (and even if it would screw in without damage, it's a bit short at 13mm)
I'm dropping a size to Imperial screw size 6, and increasing the length slightly to 16mm with my next order.