You are using an out of date browser. It may not display this or other websites correctly.
You should upgrade or use an alternative browser.
You should upgrade or use an alternative browser.
'Lady' - Red Colour Storm in Bristol
- Thread starter Jimbo
- Start date
Jimbo
Member
So I had made the silly mistake of replacing the stereo front with a cassette in, it wouldn't eject as the door was closed rather than being held open as it should be. I figured this out after taking the front off, scratching my head, ejecting the tape and have a "eureka/I'm an idiot" moment.
Next up was the climate control buttons. Before:

After:

An improvement but not perfect, I didn't bother with the end ones as they're not the easiest to remove. A bit concerned about the lower two buttons as they sit in a bit much, hopefully they'll still press OK.
Aside from a USB port in a better location I'm getting to the stage where I might have to actually fix some problems with the car rather than just playing around
Next up was the climate control buttons. Before:
After:
An improvement but not perfect, I didn't bother with the end ones as they're not the easiest to remove. A bit concerned about the lower two buttons as they sit in a bit much, hopefully they'll still press OK.
Aside from a USB port in a better location I'm getting to the stage where I might have to actually fix some problems with the car rather than just playing around
It might not be you. Reports of buttons of a slightly different design.
http://www.a2oc.net/forum/showthread.php?27080-Climate-control-button-replacement
Andy
http://www.a2oc.net/forum/showthread.php?27080-Climate-control-button-replacement
Andy
Jimbo
Member
It might not be you. Reports of buttons of a slightly different design.
http://www.a2oc.net/forum/showthread.php?27080-Climate-control-button-replacement
Andy
Cheers Andy - have seen that thread but did not pay enough attention to it! I've still got all the old buttons to hand which should make it a lot easier
I did have to take a little nick out of one of the radio buttons in the end so should have wised me up. Again - why would anyone change such small details!Despite not working the panel did look great in the dark with all the buttons lighting up correctly
Jimbo
Member
So not sure what's wrong with the button Reading back that post it should have been a drop in replacement and inspecting the new and old side by side they look identical with indents in the right places. I cleaned up any mess in the guide channels caused by removing the button a few times but it still didn't work so just swapped back to the old one. A mystery!
Did give the car a wash as it was growing things:

Reading back that post it should have been a drop in replacement and inspecting the new and old side by side they look identical with indents in the right places. I cleaned up any mess in the guide channels caused by removing the button a few times but it still didn't work so just swapped back to the old one. A mystery!Did give the car a wash as it was growing things:
Jimbo
Member
The thermostat being stuck caused some grief this weekend - I can put up with the worse fuel economy but not driving in freezing conditions without heating! I'll try and get her booked in before Christmas - in the mean time I have deployed some tactical cardboard in-front of the radiator which sorted everything out wonderfully!
Jimbo
Member
Now pondering selling The service light has come on, I've got a broken ankle, and we only need a car a couple of times in the next few months so just hiring seems to make a lot more sense than spending on the old girl. I know I overpaid looking back and will take a huge hit on selling now - what do people think I will get for her being open and honest about the engine error code and thermostat issue? £800? I guess it's a fairly rare car but that doesn't always make them desirable...
The service light has come on, I've got a broken ankle, and we only need a car a couple of times in the next few months so just hiring seems to make a lot more sense than spending on the old girl. I know I overpaid looking back and will take a huge hit on selling now - what do people think I will get for her being open and honest about the engine error code and thermostat issue? £800? I guess it's a fairly rare car but that doesn't always make them desirable...audifan
A2OC Donor
Try adjusting the 2 cables that operate the gear change selectors. Not a difficult job, you basically lock the gear selector using a built in pin on the gearbox, remove the gearstick gaitor and lock the gearlever in position and release the twist to turn locks on the 2 cables, I also put a little but of pressure on the cables to get them slightly tighter. Gear change is slick smooth and positive after adjusting mine. Pretty sure there is a guide on here , if not google is your friend.
Adjusting selector mechanism
Special tools and workshop equipment required
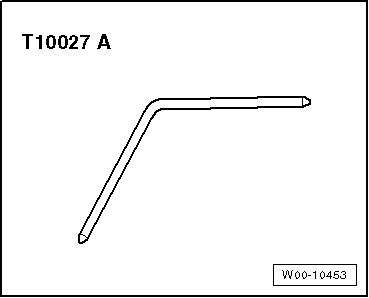
t Locking pin -T10027 A-
 Note
Note
t The following are prerequisites for correct gear lever alignment:
t Gear selector linkage must be in proper condition and undamaged.
t Selector mechanism must move freely.
t The gearbox, clutch and clutch mechanism must also be in proper condition.
l Gearbox in neutral.
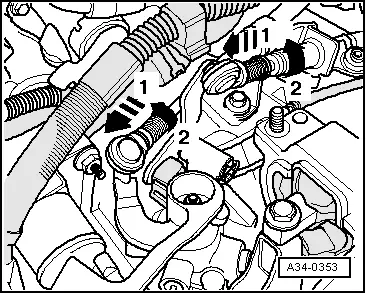
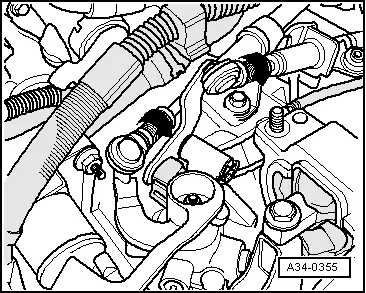
Release cable end-pieces for gate selector cable and gear selector cable as follows:
– Pull locking mechanism on gate selector cable and gear selector cable forwards in direction of -arrow 1- onto stop.
– Turn locking sleeve in direction of -arrow 2- up to limit stop and clip locking sleeve in place.
Note
It should now be possible to move the cable in the cable end-piece.
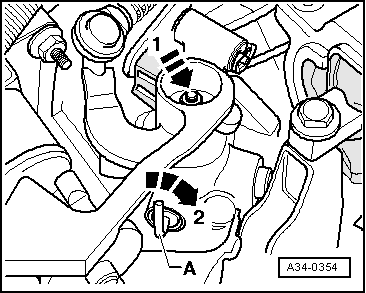
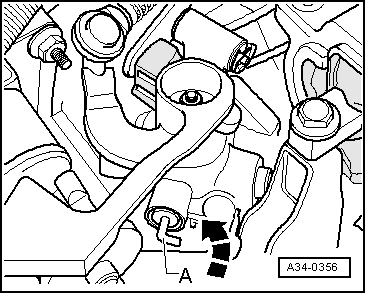
Lock the selector shaft as follows:
– Push gearbox selector lever down into 1st/2nd gear gate in direction of -arrow 1-.
– While pressing selector shaft down, press locking pin -A- slightly towards selector shaft, then turn locking pin -A- 90° in direction of -arrow 2- until it engages noticeably.
The selector shaft is then locked and can no longer be moved.
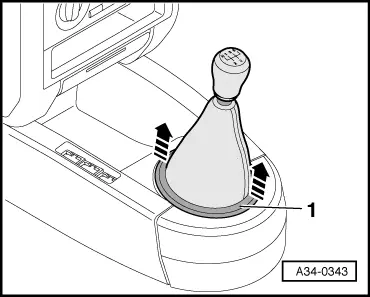
– Lift gear lever boot -1- off centre console in direction of arrow.
– Pull boot up and over gear knob.
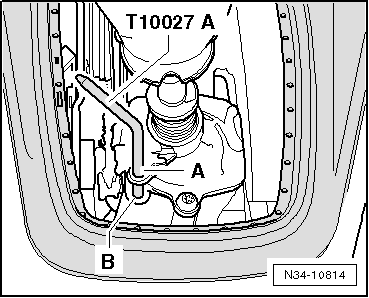
Now lock the gear lever as follows:
– With gearbox in neutral, guide gear lever to the left into 1st/2nd gear gate.
– Then guide locking pin -T10027 A- through hole -A- and into hole -B-.
– Ensure that gate selector cable and gear selector cable are located free of tension in selector cable end-pieces.
– Turn locking mechanism on gear selector cable and gate selector cable in direction of -arrow- as far as stop and release.
The spring presses the locking mechanism into normal position.
– Now turn locking pin -A- back to original position -direction of arrow-.
Locking pin -A- is slightly pressed out of selector mechanism cover during this process.
Note
t Locking pin -A- should be pressed out of selector mechanism cover as far as stop and point vertically upwards.
t Selector shaft should move up and down (gate selector movement).
– Pull pin -T10027 A- out of holes -A- and -B-.
– Install gear lever boot.
Function
l With the gearbox in neutral, the gear lever should rest in the gate for 3rd and 4th gear.
– Depress clutch.
– Select all gears several times. Pay particular attention to the operation of the reverse gear locking mechanism.
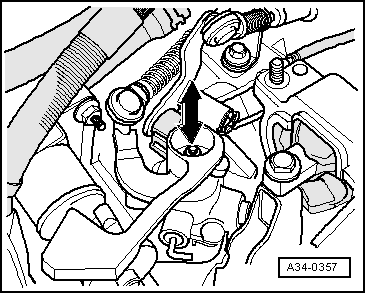
Should a gear fail to engage smoothly after repeated selection, check the play (lift movement) of the selector shaft as follows:
– Engage 1st gear.
– Push gear lever as far as it will go to the left and release.
– At the same time observe selector shaft on gearbox (2nd mechanic).
– The selector shaft should move up and down approx. 1 mm (in direction of -arrow-) when the gear lever is moved.
– If this is not the case, adjust selector mechanism again → Chapter.
On the gear stick i used a drill that fitted in the 2 holes with no problems. Start to finish about 40 minutes and well worth the effort.
Adjusting selector mechanism
Special tools and workshop equipment required
t Locking pin -T10027 A-
t The following are prerequisites for correct gear lever alignment:
t Gear selector linkage must be in proper condition and undamaged.
t Selector mechanism must move freely.
t The gearbox, clutch and clutch mechanism must also be in proper condition.
l Gearbox in neutral.
Release cable end-pieces for gate selector cable and gear selector cable as follows:
– Pull locking mechanism on gate selector cable and gear selector cable forwards in direction of -arrow 1- onto stop.
– Turn locking sleeve in direction of -arrow 2- up to limit stop and clip locking sleeve in place.
It should now be possible to move the cable in the cable end-piece.
Lock the selector shaft as follows:
– Push gearbox selector lever down into 1st/2nd gear gate in direction of -arrow 1-.
– While pressing selector shaft down, press locking pin -A- slightly towards selector shaft, then turn locking pin -A- 90° in direction of -arrow 2- until it engages noticeably.
The selector shaft is then locked and can no longer be moved.
– Lift gear lever boot -1- off centre console in direction of arrow.
– Pull boot up and over gear knob.
Now lock the gear lever as follows:
– With gearbox in neutral, guide gear lever to the left into 1st/2nd gear gate.
– Then guide locking pin -T10027 A- through hole -A- and into hole -B-.
– Ensure that gate selector cable and gear selector cable are located free of tension in selector cable end-pieces.
– Turn locking mechanism on gear selector cable and gate selector cable in direction of -arrow- as far as stop and release.
The spring presses the locking mechanism into normal position.
– Now turn locking pin -A- back to original position -direction of arrow-.
Locking pin -A- is slightly pressed out of selector mechanism cover during this process.
t Locking pin -A- should be pressed out of selector mechanism cover as far as stop and point vertically upwards.
t Selector shaft should move up and down (gate selector movement).
– Pull pin -T10027 A- out of holes -A- and -B-.
– Install gear lever boot.
Function
l With the gearbox in neutral, the gear lever should rest in the gate for 3rd and 4th gear.
– Depress clutch.
– Select all gears several times. Pay particular attention to the operation of the reverse gear locking mechanism.
Should a gear fail to engage smoothly after repeated selection, check the play (lift movement) of the selector shaft as follows:
– Engage 1st gear.
– Push gear lever as far as it will go to the left and release.
– At the same time observe selector shaft on gearbox (2nd mechanic).
– The selector shaft should move up and down approx. 1 mm (in direction of -arrow-) when the gear lever is moved.
– If this is not the case, adjust selector mechanism again → Chapter.
On the gear stick i used a drill that fitted in the 2 holes with no problems. Start to finish about 40 minutes and well worth the effort.
Last edited:
PeterS
Member
Misano red is a stunning shade of red IMO. I love it!
Our A3 is that colour, and when clean it positively glows. It’d be a shame to get rid of it, but I do sympathise if it’s not going to be used. Cars do need to be used, so perhaps someone else can do something with it now.
Prices seem to be all over the place - I paid £700 for mine with a raft of warning lights on, and probably overpaid...but It it was an almost impulse purchase...
Jimbo
Member
Cheers everyone.
Mileage is a little over 110k so not massive but won't be getting any bonus points for being under the magic 100k. Guess there's no harm in putting a for sale up with a price and 'no offers' - worst comes to the worst I'll get no offersremind us of the mileage?
Jimbo
Member
Right well, here we are nearly two months later. We're looking at getting a new Dacia Sandero and the garage has offered us £750 for our car, however the coolant leak is an unknown to them and so we're in a bit of a conundrum. I've advertised the car on here (Red Colour Storm 1.6 FSI spares or repair £500) but don't know whether it will sell at any point, or around that price. The other option would be to get a mobile mechanic out to do the work, assuming it's the water pump then that appears to be a 3-4 hour job plus parts, so maybe £250?
So far I've got the under-tray and top cam belt cover off, attached is the best picture I could get looking from the drivers side rear of the engine up. Probably the most I can do myself. I know no-one else can make this decision for me, but any pointers? If I try and get the lower cam belt cover off will that make diagnosis a lot easier?
Thanks all.
Attachments

Jimbo
Member
Cheers Kleynie. Just had a mobile mechanic on the line and it's £300 all in, this includes a new water pump (£35), cam belt and kit (£110) and 3 hours labour. Doesn't seem to be bad money for the job.That looks to be the water pump gasket, a fairly easy job for a DIY mechanic.
I guess you won't be able to tell whether it's just the gasket or the actual pump until it's in pieces? And he said whilst he could just replace the cam belt rather than buying the whole kit he wouldn't recommend it.
Jimbo
Member
Right well things have moved rather quickly and we're getting the water pump replaced on Thursday and part-ex on Friday! It means we're not getting as much back from the car as we would have hoped (having to write off over a grand in under a year is a bit painful but second hand cars are always a gamble) but our lives will be hassle free.
I'll get the ad removed from the site and keep your eyes out for a cheap car coming up at auction in the Bristol area
Thanks to everyone for support and advise over the past 9 months. Doing it again I probably should have gone for a less troublesome 1.4 petrol, or paid a bit more and got the car inspected.