DuncanA2
Member
Due to all your positive reactions, I will try to describe my take on this subject.
First my motivation. I really like the look of the more recent audi models with their integrated indicators. Our A2's are timeless in design, but to give it that bit more touch I made modifications to get it up to latest specs where possible within my skills.
I've been pondering for a long time which way to go around this, before I was confident enough to cut my mirrors. I've made two attemps, two sets of mirrorscaps. One in high glossy black and my own akoya silver colour.

Down the road I primarely proceeded on gut feeling, so bare with me on this.
What have I used:
* handtools to remove doorcards and alu plates. Handtools/ wrench to remove mirror from the door.
* 2x piece of plexiglas 20x30cm 3mm
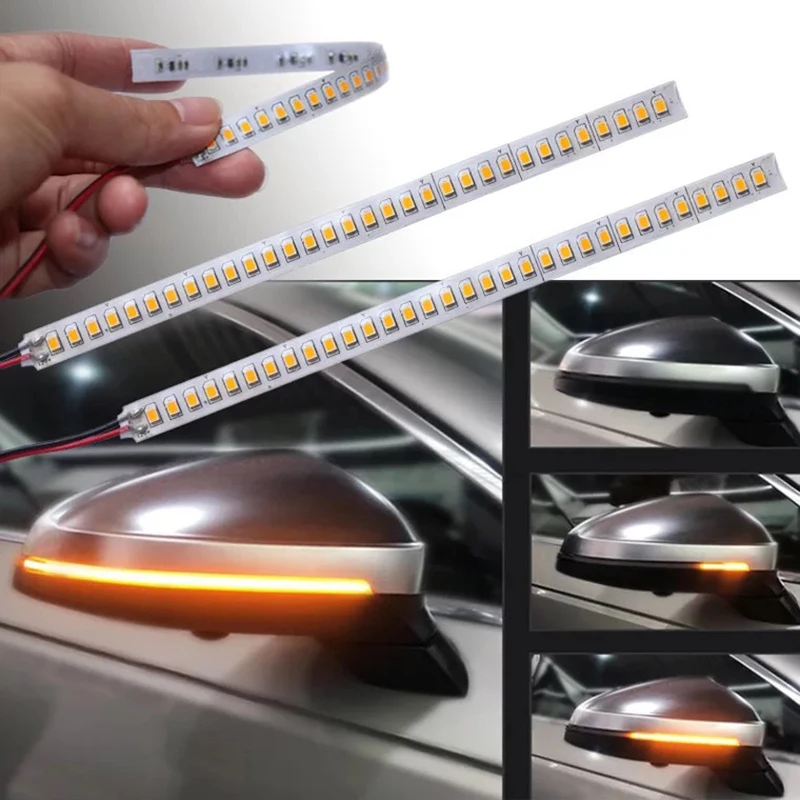
* 1x set of led indicators from aliexpress in 15cm. Or 18cm .
€ 3,92 42%OFF | 2 Pcs Auto Achteruitkijkspiegel Indicator Lamp Drl Streamer Strip Vloeiende Knipperlicht Led Auto Lichtbron Richtingaanwijzers voor Auto 'S
 a.aliexpress.com
* A dremel to work on the mirror cap and pkexiglass.
a.aliexpress.com
* A dremel to work on the mirror cap and pkexiglass.
* Sandpaper in multipal grains from p240 to p1000
* A good adhesive glue for plastic parts. I can recommend the MDF kit from Würth. Available from different sources online.
* Aluminum adhesive tape
Looking at our mirrorcap there is a slight crease . I chose to make the cut adjacent above this crease. 3mm is a bit thin to my taste, so I made cut 6mm wide. 2x 3mm on top of eachother. 6mm plates are disproportionate more expensive, hence my choice for 3mm thickness.
When we look on the inside of the caps, we see a thickening to the outside . I kept this as the outer limit of the cut and measured the 15 cm inwards of the cap along the crease. I made the cut 5mm and sanded the cut to 6mm by continouisly trying to press the plexiglas into the cut. I hope this makes sense.
Then you end with something like this

If the piece of plexiglass fits the cut . I lined the outer contoures of the cap on the pkexiglas and cut the piece to match. Once you achieved a smooth surface with the cap and plexiglas, it's time to glue both parts together. Do attend to the extend plexiglas protrudes through the cut on the inside so it won't interfere with the inarts of the mirrorassembly. But you will be alright.


The thickness of 6mm is also determined by the ledstrips maesurements. You now can glue the ledstrips to the plexiglass. Testfit!

The cable connections should be extended to go through the pivot of the mirror and through the door itself and into the chassis to the interior.
Electronic connextions are pretty straight forward. Plus (+) goes to the + of the side indicator on the juction in the A-pillars below by your feet. I have to look up the pinning and location. Minus (-) I took from the available earthing point A-pillar.
Should look something like this when you've assembled the door in reverse order.
Or this,
Depending on taste and state of the mirrorcaps you can apply some tinting spray or paint the caps to your taste.
I hope this gives you some inspiration and insides to start your journey?
First my motivation. I really like the look of the more recent audi models with their integrated indicators. Our A2's are timeless in design, but to give it that bit more touch I made modifications to get it up to latest specs where possible within my skills.
I've been pondering for a long time which way to go around this, before I was confident enough to cut my mirrors. I've made two attemps, two sets of mirrorscaps. One in high glossy black and my own akoya silver colour.
Down the road I primarely proceeded on gut feeling, so bare with me on this.
What have I used:
* handtools to remove doorcards and alu plates. Handtools/ wrench to remove mirror from the door.
* 2x piece of plexiglas 20x30cm 3mm
* 1x set of led indicators from aliexpress in 15cm. Or 18cm .
€ 3,92 42%OFF | 2 Pcs Auto Achteruitkijkspiegel Indicator Lamp Drl Streamer Strip Vloeiende Knipperlicht Led Auto Lichtbron Richtingaanwijzers voor Auto 'S
3.66£ 44% OFF|2pcs Car Rearview Mirror Indicator Lamp Drl Streamer Strip Flowing Turn Signal Lamp Led Car Light Source Turn Signals For Cars - Signal Lamp - AliExpress
Smarter Shopping, Better Living! Aliexpress.com
* Sandpaper in multipal grains from p240 to p1000
* A good adhesive glue for plastic parts. I can recommend the MDF kit from Würth. Available from different sources online.
* Aluminum adhesive tape
Looking at our mirrorcap there is a slight crease . I chose to make the cut adjacent above this crease. 3mm is a bit thin to my taste, so I made cut 6mm wide. 2x 3mm on top of eachother. 6mm plates are disproportionate more expensive, hence my choice for 3mm thickness.
When we look on the inside of the caps, we see a thickening to the outside . I kept this as the outer limit of the cut and measured the 15 cm inwards of the cap along the crease. I made the cut 5mm and sanded the cut to 6mm by continouisly trying to press the plexiglas into the cut. I hope this makes sense.
Then you end with something like this
If the piece of plexiglass fits the cut . I lined the outer contoures of the cap on the pkexiglas and cut the piece to match. Once you achieved a smooth surface with the cap and plexiglas, it's time to glue both parts together. Do attend to the extend plexiglas protrudes through the cut on the inside so it won't interfere with the inarts of the mirrorassembly. But you will be alright.
The thickness of 6mm is also determined by the ledstrips maesurements. You now can glue the ledstrips to the plexiglass. Testfit!
The cable connections should be extended to go through the pivot of the mirror and through the door itself and into the chassis to the interior.
Electronic connextions are pretty straight forward. Plus (+) goes to the + of the side indicator on the juction in the A-pillars below by your feet. I have to look up the pinning and location. Minus (-) I took from the available earthing point A-pillar.
Should look something like this when you've assembled the door in reverse order.
Or this,
Depending on taste and state of the mirrorcaps you can apply some tinting spray or paint the caps to your taste.
I hope this gives you some inspiration and insides to start your journey?
