How do you remove the glovebox?

Misano Man

Member
Ok, as per the thread title - how do you remove the glovebox? All the posts regarding freeing off temperature flaps start with ‘remove the glovebox’ but having had a quick look I can’t see how to do it, and I can’t find any guides on here either.
 
Hi,

the glove box is held in place by 5 bolts with a torx driver head.
There are 3 bolts along the upper edge inside the glove box and two on the outside at the back in the foot well (one each side).

On the inside, you may need to unclip the coin holder to get proper access to the head of the bolt on the right.

On the outside, you won't be able to see the outer left bolt straight away. That's because its behind the side plastic trim.

To remove the side sill trim, first remove the small filler piece between the left of the dash. Its clipped in place so just pulls towards you. Note that the lower end as a lug that keys into a hole in the lower trim so removal is a slight rotation until you can pull the lug out.
Once the filler is removed, you need to unclip the part of the trim that goes along the bottom of the door sill. This is cliped downwards using 3 metal clips that fit into the body. The clips can be released by pulling upwards. They will be very strong.
Once the clips are released and the rear end of the trim is disengaged from the center section, the whole trim can be slid backwards and then removed.
This will expose the left hand bolt which can now be undone.
Its not really possible to remove the glove box with the the side trim in place without breaking something.

Replacing the side trim is the reverse process. Before fitting, ensure that the metal clips are attached to the plastic before refitting. As they hold very strongly they may be left in the holes in the body and so need to be refitted.

regards

Andrew
 
Just to add to Andrew's guide, once all bolts are removed you will need to disconnect the glovebox light switch before complete removal. This is on the left and accessible once you have lowered the glovebox a little way. I would suggest putting something in the footwell to rest the glovebox on to free both hands to undo the connector - it can be fiddly. My improvisation here may be of help.

Andy
 
Hi. Im new to all this. I have that seat problem too, but on top of it all thoes seats gets soaking wet in wet weather. Could it be related to seats not being locked in to the place?
 
Hi guys, I'm trying to remove the glove box door only, it looks tatty and I want to repaint it. Can I remove just the door or I need the whole box out?
I also want to remove these as well marked with X
The rear coin tray came out easy, but looks like the handbrake lever is too wide for the base to just come off.
No idea around the transmission bits though, don't want to break anything so didnt force it. Thanks
49049
49050
 
If you tug hard forwards with a firm grip on the black leather handbrake cover it should come straight off. The tray should then lift out (if not glued down) over the handbrake and you can gain access to disconnect the cigarette lighter wires.
 
Last edited:
Here is a link to the glovebox removal...…..

 
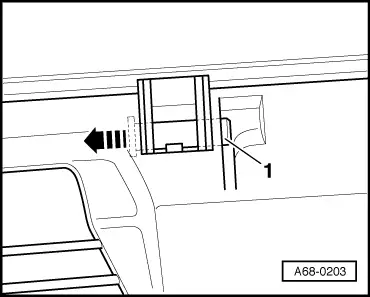
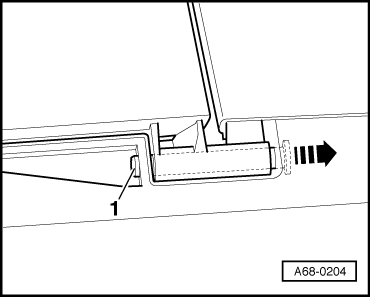
Glove box lid only
Removing and installing glove box lid
Remove glove box → Chapter.
Remove cushioning mechanism for glove box lid → Chapter.

Press out pin -1- in direction of arrow.
A68-0203

Press out pin -1- in direction of arrow.
Detach glove box lid.
A68-0204
 
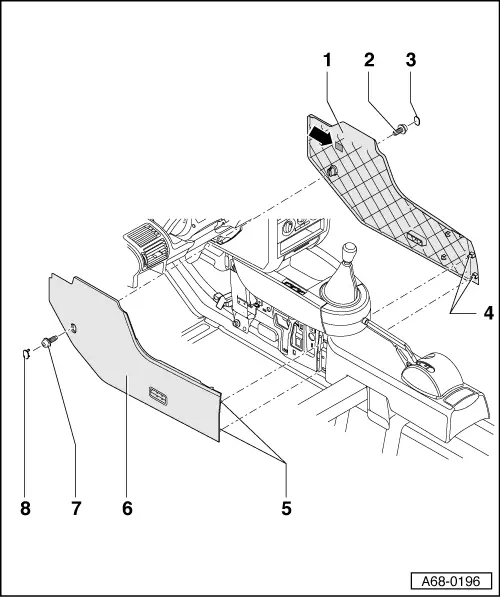
Removing and installing rear centre console side trim
a2-950.png

1 - Right centre console side trim
q Use flat screwdriver to prise out cap -3-.
q Unscrew bolt -2-.
q Reach beneath side trim -1- at clips -4- and unclip side trim -1-.
q Unfasten side trim -1- at Velcro strip -arrow-.
q Pull out side trim -1- beneath glove box.
2 - Bolt
q Tightening torque 4 Nm
3 - Cap
4 - Clips (4x)
5 - Clips (4x)
6 - Left centre console side trim
q Use flat screwdriver to prise out cap -8-.
q Unscrew bolt -7-.
q Reach beneath side trim -6- at clips -5- and unclip side trim -6-.
q Unfasten side trim -6- at Velcro strip.
q Pull out side trim -6- beneath driver's storage compartment.
7 - Bolt
q Tightening torque 4 Nm
8 - Cap

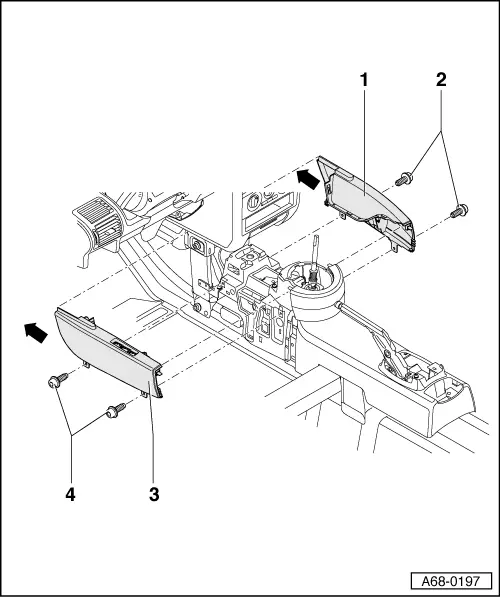
Removing and installing rear centre console knee guide
a2-951.png

1 - Right knee guide
q Remove right centre console side trim → Chapter.
q Remove centre console insert → Chapter, Item no. 1.
q Unscrew bolts -2- (2x).
q Slide out knee guide -1- to front (direction of arrow).
2 - Bolts (2x)
q Tightening torque 4 Nm
3 - Left knee guide
q Remove left centre console side trim → Chapter.
q Remove centre console insert → Chapter, Item no. 1.
q Unscrew bolts -4- (2x).
q Slide out knee guide -3- to front (direction of arrow).
q Press out switches in knee guide -3- from underneath and unplug connectors.
4 - Bolts (2x)
q Tightening torque 4 Nm


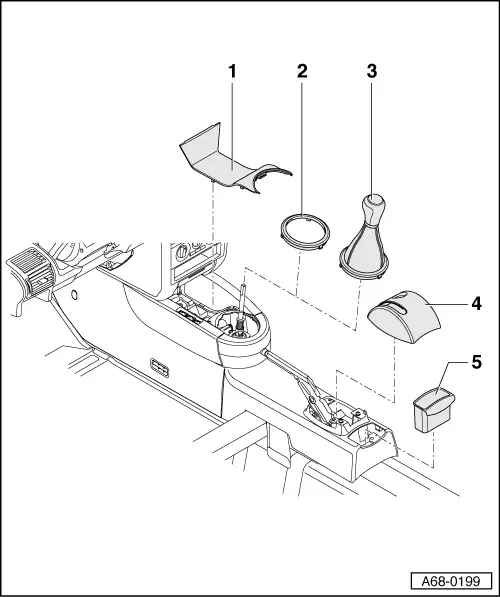
Removing and installing rear centre console attachments
a2-952.png

1 - Centre console insert
q Unclip boot -3- or cover for direct shift gearbox -2-.
q Unclip centre console insert -1- upwards.
q 3x clips
2 - Cover for direct shift gearbox
q Unclip cover for direct shift gearbox upwards.
3 - Boot with gear stick knob
q Unclip boot upwards.
q Sever hose clamp and detach boot with gear stick knob.
4 - Handbrake lever console
q Apply handbrake.
q Unclip handbrake lever console upwards.
q 2x clips
5 - Rear storage compartment
q Lift out rear storage compartment.


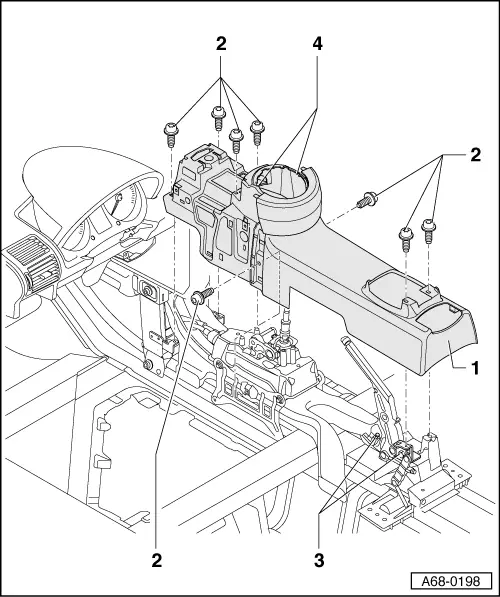
Removing and installing rear centre console
a2-953.png

1 - Rear centre console
q Removing
q Manual gearbox:
q Unclip boot → Chapter, Item no. 3.
q Direct shift gearbox:
q Unclip cover for direct shift gearbox → Chapter, Item no. 2.
q Additional rear storage compartment:
q Remove additional rear storage compartment → Chapter.
q All models:
q Remove rear storage compartment → Chapter, Item no. 5.
q Remove handbrake lever console → Chapter, Item no. 4.
q Remove left and right centre console side trim → Chapter.
q Remove centre console insert → Chapter, Item no. 1.
q Remove left and right knee guides → Chapter.
q Unscrew bolts -2- (8x).
q Move gear lever/selector lever to front position.
q Fully apply handbrake.
q Lift back of rear centre console -1- and pull front fully forwards.
q Take out rear centre console -1- (unscrew bolts -3- at handbrake lever if necessary).
q Manual gearbox: Slide out boot downwards through openings -4-.
2 - Bolts (8x)
q Tightening torque 4 Nm
3 - Bolts (2x)
4 - Openings
 
that second one is a pig of a job. Also: don't do it when cold, you will break something. I would also want to take the front seats out to get the console out, which would bring the time in one direction to around 4 hours when you know what you're doing.

Why do you feel the need to remove them?

- Bret
 
If you tug hard forwards with a firm grip on the black leather handbrake cover it should come.....cigarette lighter wires.
Thanks, hopefully isn't glued down, and I've found plenty of guide on how to remove whole box, I just thought lid can be removed, without needing to get the full stuff out, cheers
 
[QUOTE="bretti_kivi, post: 345132, member: 654Why do you feel the need to remove them?[/QUOTE]
The paint is peeling of badly, mostly on the glove box, and faded on other panels too, like centre console. I want to give a nice new look.
 
that second one is a pig of a job. Also: don't do it when cold, you will break something. I would also want to take the front seats out to get the console out, which would bring the time in one direction to around 4 hours when you know what you're doing.

Why do you feel the need to remove them?

- Bret

It's in no way a 4 hour job. I can remove a centre console including removing the front seats in about 30 minutes, but what the instructions above do not mention is the need in most cases to undo one of the bolts on the handbrake lever to make manoeuvring it easier.
 
Several points about the glovebox.

1. A tip. When the glovebox is finally released you will have to lower it for access to the glovebox light connector that needs disconnecting. Borrow a few loose cushions off the settee to rest the glovebox on. This will then give you two hands to release the connector, it's a pig. How I did it is here.

2. The light switch will usually be broken. Ideal time for a simple repair with a @depronman tang.

There is a point 3., but no time, I will come back to it later.

Andy
 
3. I question if it is worth the effort of painting the glovebox door. The door has a textured surface, tiny pebble beach effect that you will never duplicate and destroy if you sand out the scratches and/or use filler, it will look terrible if you do not strip all existing paint. Then there is the problem of finding matching paint colour, gloss finish. Easier just to spend £20ish on a replacement in reasonable nick from one of the recyclers on here. It's up to you.

Andy
Yes the light isn't working, so will have a look at that too. I want to try the painting and see what I can do about it, if all fails I just look for another box. I've done these before on other cars and the finish usually looked really good. I'm thinking to get beige colour to keep the cabin bright and match the door panels, or go full black but then it might feel smaller inside to dark colours. Not sure yet, but when it's done I'll post a few pics. Cheers
 
Yes the light isn't working, so will have a look at that too. I want to try the painting and see what I can do about it, if all fails I just look for another box. I've done these before on other cars and the finish usually looked really good. I'm thinking to get beige colour to keep the cabin bright and match the door panels, or go full black but then it might feel smaller inside to dark colours. Not sure yet, but when it's done I'll post a few pics. Cheers
The reason the light is not working is a dead bulb, replace it and it work fine. The problem with the light switch is the broken tang that is needed to switch off the light when the door is shut, resulting in the bulb illuminating continuously and quickly using up its lifespan.

Andy
 
Back
Top