How to replace Clutch Master Cylinder?

Leopard680

A2OC Donor
I've had a very bad week this week made worse by the failure of this part. New part is being delivered tomorrow...

Anyone done this?

I've looked at a guide on line but it doesn't look anything like mine...

Car is needed for work and I don't do 9-5 Monday to Friday...

Any help much appreciated.
 
Removing and installing clutch master cylinder
Special [COLOR=#1B8EDE !important]tools[/COLOR] and workshop [COLOR=#1B8EDE !important]equipment[/COLOR] required
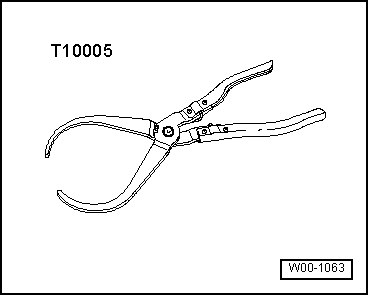
t Pliers -T10005-
a2-3544.png
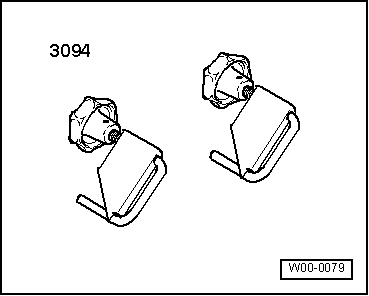
t Hose clamps, up to 25 mm -3094-
Removing
a2-3545.png
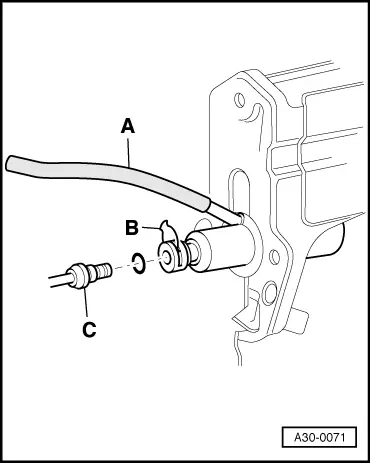
Clamp off supply hose -A- coming from brake fluid reservoir using hose clamp, up to 25 mm -3094-.
Disconnect supply hose -A- at clutch master cylinder.
Pull clip -B- for pipe/hose [COLOR=#1B8EDE !important]assembly[/COLOR] out of clutch master cylinder as far as stop.
Pull pipe/hose assembly -C- out of clutch master cylinder and seal.
Press in clip -B- back onto stop.
[COLOR=#1B8EDE !important]Remove[/COLOR] covers on driver's [COLOR=#1B8EDE !important]side[/COLOR] (bottom) → Rep. Gr.68.
a2-3546.png
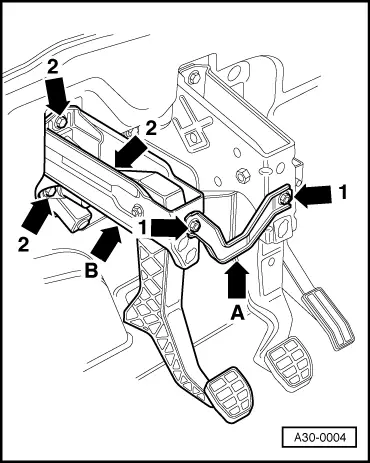
Now remove complete clutch pedal mounting bracket as follows:
Remove securing nuts -arrows 1- and detach connecting plate -arrow A-.
If fitted, disconnect cruise control [COLOR=#1B8EDE !important]system[/COLOR] switch.
Then unscrew securing bolts and nuts -arrows 2- for mounting bracket -arrow B-.
Take off mounting bracket.
a2-3547.png
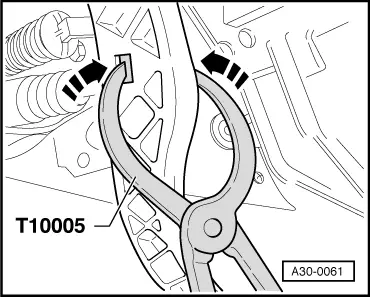
[COLOR=#1B8EDE !important]Release[/COLOR] master cylinder operating rod from clutch pedal as follows:
Position pliers -T10005- in the clutch pedal recesses.
Press the mounting together -arrows- and [COLOR=#1B8EDE !important]separate[/COLOR] the clutch pedal from the clutch master cylinder.
a2-3548.png
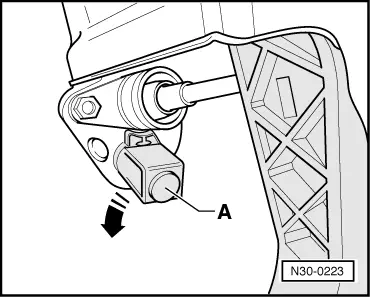
Turn stop -A- for clutch pedal in direction of -arrow- and remove.
a2-3549.png
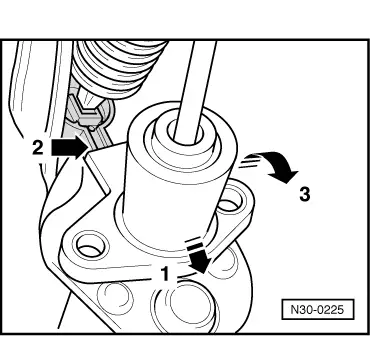
Then push master cylinder in the direction of -arrow 1- onto stop.
It must not be covered in upper area by over-centre spring mounting -arrow 2-.
Then swing clutch master cylinder in direction of -arrow 3- out of mounting bracket.
Installing
[COLOR=#1B8EDE !important]Installation[/COLOR] is carried out in [COLOR=#1B8EDE !important]reverse[/COLOR] sequence; note the following:
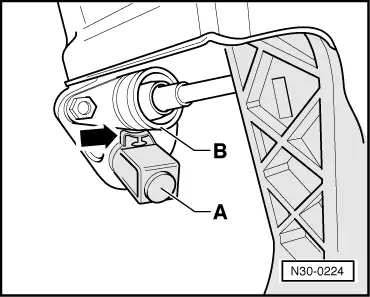
a2-3550.png
Retaining clip -A- must be fitted on operating rod -B- of clutch master cylinder.
Press clutch pedal in -direction of arrow- until it engages. Ensure that it is properly locked.
a2-3551.png
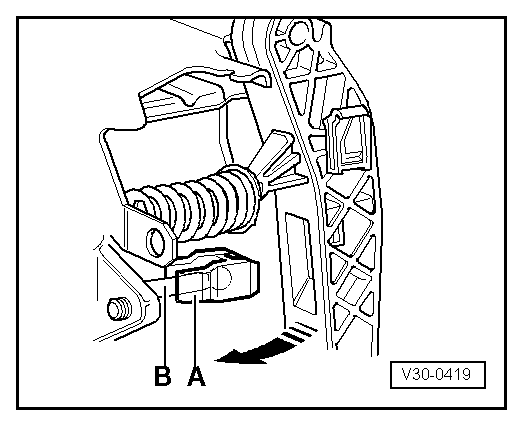
Fit stop -A- for clutch pedal again.
Installation position:
The arm -arrow- points towards clutch master cylinder -B-.
Bleed clutch system after installing clutch master cylinder → Chapter.
a2-3552.png
Press in retaining clip -B- as far as stop.
Push pipe -C- into clutch master cylinder until it engages audibly.
Push supply hose -A- from brake fluid reservoir on as far as it will go.
Bleed clutch system after installing clutch master cylinder → Chapter.
a2-3546.png
 
Thankyou very much Sarge. I had a look at the pedal box and the castings- not shown- make it look very different. Are the pipe connections behind the firewall?
 
Clutch.JPG

#NumberDescriptionQty.


clutch pedal mechanism; lhd; PR-T0U,T1Q,; T94,T60
11J0721410seal1
28Z1721373Abracket1
3N 0103691hexagon bolt; M8X581
4N 90074401hexagon nut, self-locking; M81
5N 90183802hexagon collar nut; self-locking; M8X
68Z1721379connecting plate1
81J0721153bearing bush1
9WHT000761bearing pin1
9WHT000671bearing pin; 13X44,111
91J0721157bearing pin1
108Z0721315clutch pedal switch; PR-T1Q,T941
108Z0721315Aclutch pedal switch; PR-T0U,T601
111J0721174Acap1

1J0721174A 01Csatin black
111J0721174Ccap1

1J0721174C 01Csatin black
128Z0721423support1
131J2721403Aover-centre spring......; PR-T0U,T601
131J2721403Bover-centre spring......; PR-T1Q,T941
141J1721232Astop bar1

1J1721232A B41satin black
151J0721381stop buffer1
16857721453hose; shorten to:; 350MM; 235MM1
178Z1721388master cylinder1
178Z1721388Amaster cylinder1
188Z0723753bungs
188Z0723753Abungs
198Z1721465Dpipe/hose line; PR-T1Q
198Z1721465Fpipe/hose line; PR-T1Q
198Z1721465Hpipe/hose line; PR-T1Q
198Z1721465Hpipe/hose line; PR-T941
198Z1721465Epipe/hose line; PR-T0U
198Z1721465Gpipe/hose line; PR-T0U
198Z1721465Jpipe/hose line; PR-T0U,T60
22N 10240002hex collared bolt; M8X322
22N 10240004hex collared bolt; M8X322
236Q0721261Cslave cylinder; PR-T0U
236Q0721261Eslave cylinder; PR-T0U
236Q0721261slave cylinder; PR-T0U
238Z0721261Aslave cylinder; PR-T0U,T60
236Q0721261Aslave cylinder; PR-T1Q
236Q0721261Dslave cylinder; PR-T1Q
236Q0721261slave cylinder; PR-T1Q
236Q0721261Cslave cylinder; PR-T1Q
236Q0721261Eslave cylinder; PR-T1Q
238Z0721261slave cylinder; PR-T1Q
238Z0721261slave cylinder; PR-T941
246Q0721487Bretaining plate; PR-T1Q,T941
246Q0721487Dbracket; PR-T1Q,T941
246Q0721487Cretaining plate; PR-T0U,T601
251H0721357support1
267M0721431securing ring1
2802F141143Ao-ring; 9,25X6,07X1,78X
29N 10138902hex collared bolt; M8X60; PR-T0U,T601
70G 052142A2poly lubricant; 400G1
 
Well I'm writing from a train... Alison is at an Audi specialist in Kent. She will be ready tomorrow. Now interestingly, I was going to do the job myself however the diagrams above- and ECTA- bear no resemblance to the set up in my car. The specialist used more colourful language to tell me. So word of warning; the steering column and the lower dash and assemblies need to come out to replace this part.

Going to be an expensive day out tomorrow!
 
Apologies, can't seem to upload pictures here... anyway a cursory check of your pedal box should confirm the considerable differences between the diagrams and the actual layout. This is important because as our cars are getting older these parts will start to fail. I paid around £650 for this job...
 
Back
Top