Hi all,
here is an update and cheap fix for this broken part from my last post on..........
(http://www.a2oc.net/forum/showthrea...mp-Potentiometer-part-number-amp-Costs-anyone)
After looking around for a new cheap Vacuum actuator/Solenoid valve and Potentiometer etc I decided to try and fix it myself, here's how it goes in pictures.
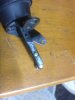
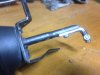
1. Broken Vacuum actuator arm fix.
2. it works perfectly and is super reinforced strong, better than original.
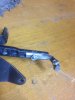
Intake manifold flap end fix.
1. as you can see in Photo 7 the broken part from the intake manifold flap is attached, with very steady hands I sprayed a little of the Glue power onto both surfaces of the broken components, held it in place as the power is dry at this point, once I had in on correctly I applied the Glue via the Swans neck accurate pipe attachment that comes in the kit and ran the glue in very slowly, it activates in 7 seconds, I gave it 20 seconds then moved the intake manifold flaps up and down just incase any stray glue went where it shouldn't but, it was fine and worked well.
after 30 minutes I sprayed WD40 into the Potentiometer for good measure.
Everything works well now but, still have the dreaded flat spot at 3000 rpm, that only happens after over-run and then acceleration, crazy? Sometimes it's ok, reading on these forums it would seem this is an enigma of a problem!
Anyway we'll see how it goes.
Forgot to say that this EVER BUILD glue is fantastic stuff and it really works! £ 9.98 from Toolstation etc.
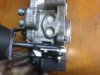
Solenoid fix.
1. strip out solenoid and fill with WD40, check contacts then remove WD40, get a 12 volt supply and test the solenoid works by tapping positive with probe from 12 volt supply, do this tapping fast as thats what the ECU does (so I've read). Then replace all vacuum pipes attached to this including the wee none return valve on the side of the engine, make sure you take note of the correct direction here, dark (Black) down and light side up on mine. Clean this out with WD40 too, then blow one way and turn around blow again and you cant blow through it, it should be ok then.
When replacing the solenoid watch out for the screw/hex bolt square washers as they can drop into the bottom of the engine and your stuffed!


I can't up load any more photos so I'll upload on another post
Broken inlet manifold end flap position (yes it's fiddly alright!) Shown repaired and in place. (see other post)
Hope this helps you all in some small way.
Cheers
Doug
here is an update and cheap fix for this broken part from my last post on..........
(http://www.a2oc.net/forum/showthrea...mp-Potentiometer-part-number-amp-Costs-anyone)
After looking around for a new cheap Vacuum actuator/Solenoid valve and Potentiometer etc I decided to try and fix it myself, here's how it goes in pictures.
1. Broken Vacuum actuator arm fix.
2. it works perfectly and is super reinforced strong, better than original.
Intake manifold flap end fix.
1. as you can see in Photo 7 the broken part from the intake manifold flap is attached, with very steady hands I sprayed a little of the Glue power onto both surfaces of the broken components, held it in place as the power is dry at this point, once I had in on correctly I applied the Glue via the Swans neck accurate pipe attachment that comes in the kit and ran the glue in very slowly, it activates in 7 seconds, I gave it 20 seconds then moved the intake manifold flaps up and down just incase any stray glue went where it shouldn't but, it was fine and worked well.
after 30 minutes I sprayed WD40 into the Potentiometer for good measure.
Everything works well now but, still have the dreaded flat spot at 3000 rpm, that only happens after over-run and then acceleration, crazy? Sometimes it's ok, reading on these forums it would seem this is an enigma of a problem!
Anyway we'll see how it goes.
Forgot to say that this EVER BUILD glue is fantastic stuff and it really works! £ 9.98 from Toolstation etc.
Solenoid fix.
1. strip out solenoid and fill with WD40, check contacts then remove WD40, get a 12 volt supply and test the solenoid works by tapping positive with probe from 12 volt supply, do this tapping fast as thats what the ECU does (so I've read). Then replace all vacuum pipes attached to this including the wee none return valve on the side of the engine, make sure you take note of the correct direction here, dark (Black) down and light side up on mine. Clean this out with WD40 too, then blow one way and turn around blow again and you cant blow through it, it should be ok then.
When replacing the solenoid watch out for the screw/hex bolt square washers as they can drop into the bottom of the engine and your stuffed!
I can't up load any more photos so I'll upload on another post
Broken inlet manifold end flap position (yes it's fiddly alright!) Shown repaired and in place. (see other post)
Hope this helps you all in some small way.
Cheers
Doug
Last edited: