You are using an out of date browser. It may not display this or other websites correctly.
You should upgrade or use an alternative browser.
You should upgrade or use an alternative browser.
Rocker cover removal
- Thread starter Verbdog
- Start date
chrisnic
Member
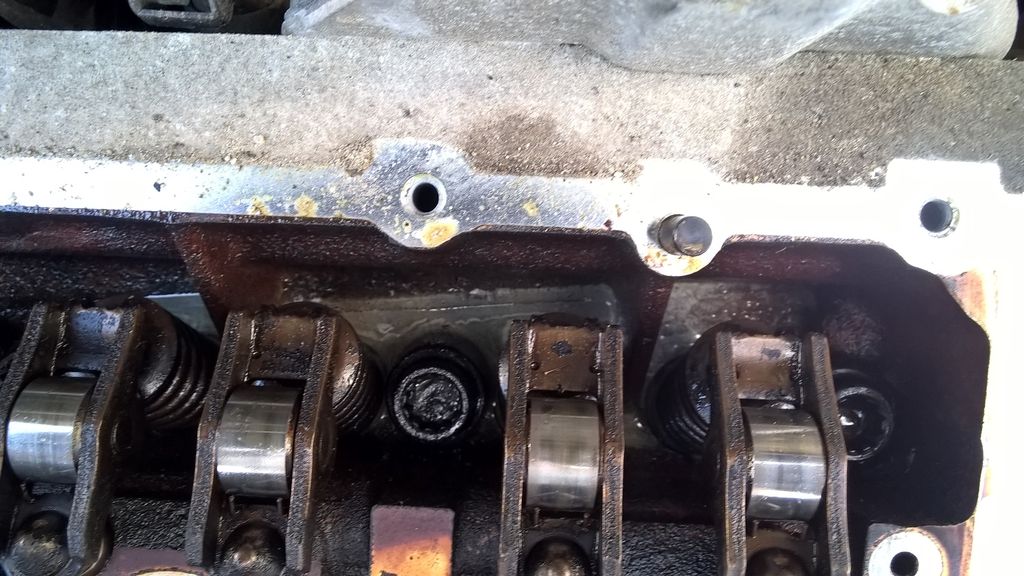
You do need to remove the belts to remove the cover as the camshafts are integral to the cover - see pic

You can get a better idea from the online manual at http://workshop-manuals.com/audi/a2.
I hope that helps.
chris
You can get a better idea from the online manual at http://workshop-manuals.com/audi/a2.
I hope that helps.
chris
bretti_kivi
Member
there's a tool to lock the pulleys in place, I believe.... VW special.
- Bret
- Bret
Mustang-owner
Donor
You shouldn't need to force the cam cover back in place, it should pop back down when re-bolted in place, but I guess it depends on how hard you tried to remove it and if any rockers are out of place!
Maybe you could advise what you were hoping to achieve by its removal?
Your engine is a twin over-head camshaft, not an over-head valve, therefore you'll not find a "rocker cover".
If I was given the task of getting the engine running now, I'd do the following:
1. Cut the main cam belt just where it is without turning the engine at all (crank to inlet cam belt). Leave the Inlet cam to exhaust cam belt in place.
2. Remove the cam cover and camshafts (this means all 16 valves are fully closed so cannot hit the pistons).
3. Time the crank correctly.
4. Time the cams correctly (they are off the car and on the bench, still with the coupling belt in place).
5. Inspect top end (cams and valve train), replace where necessary.
6. Rebuild as per normal process. New rocker bolts should be used as well as a new crank pully bolt.
The below attachment should help you remove and refit the cam cover.
View attachment remove and install cam cover AUA.pdf
Cheers
Jeff
Last edited:
Thanks for the info Jeff, this saga/dilemma started fairly innocently with an MOT fail and this thread: http://www.a2oc.net/forum/showthread.php?27850-New-year-new-mot-same-ol-emissions-fail which led to checking the plugs, finding Oil flooding one and advice to check the cover gasket.
I began this dedicated thread to stop the other rambling away.
I have done nothing apart from remove the bolts, I will try tomorrow to carefully coax it back down but the pressure from the belts at that end is significant.
If I can get that done I will have to call help in as i'm not competent or confident to try the steps you list.
I am confused !! (My usual state)
The PDF shows 4 coils (on the spark plugs) as far as I know the AUA engine has one coil and normal HT leads?
Steve B
You are not confused Steve, the AUA does not have coil packs.
bretti_kivi
Member
AUA does not have coil packs
BBY has coil packs. BBY from around May 2003 onwards, AUA before that.
- Bret
BBY has coil packs. BBY from around May 2003 onwards, AUA before that.
- Bret
Mustang-owner
Donor
Yes,
As Bret and Steve have both advised, the AUA doesn't have individual coil packs.
It appears the diagram in the PDF is a generic one - however the OP has already identified this.
-----------------
I've now read your linked thread re. the oil in the spark plug recess, and I'd concour that, as long as the spark plug was not cross threaded, the oil will be entering this recess due to a breakdown of the mating gasket.
Unfortunately for you, this gasket is of the silicone type.
As you have now broken the seal of the gasket material, even if you get the cam cover back in place, you'll certainly have many more oil leaks (the other spark plug recesses and the perimeter of the cam cover, so the full removal and re-fitment of the cam cover is now necessary.
For info, diagram N15-0075 in my attached PDF is supposed to show the areas that require the gasket sealant, however the drawing isn't very clear.
You should find the evidence of old silicone, but in case that's not clear either, then all four edges need sealant, along with the visable webbing mating surfaces, and obviously the mating surfaces for the spark plug recesses.
This isn't going to be the news you were hoping for I'm sure, but this might be a good chance to upskill yourself.
If you don't want to do this work yourself, then I think I'd suggest not putting the engine back together, just leave it for someone else to do.
If you do decide to put it back together, then once it is complete, but with all the plugs out, turn the engine using the crank pulley by hand (or wrench) several rotations to make sure you can feel no interference from misplaced internals.
You must then take great care when starting the engine as coupling belt between both camshafts will not be tensioned correctly, and if it slips or breaks then you'll most certainly be looking at a very much larger bill as you'll have valve damage.
I'd expect the cost to resolve this issue (leaving everything as it is now) to be the price of a cambelt change + 2hrs labour + the additional parts (new camshaft cover bolts and gasket sealant).
Hope this helps a little.
Jeff
Thanks Jeff, very informative posts.
The plug thread was not crossed but 3 of the housing (I, and think everyone else, should stop calling it a cover when it's more than that!) bolts were knackered but thankfully my set of grip-outs did the job.
If I get it back in place it will only to allow the job to be done correctly next time, I have no inclination to drive it until properly done.
I sometimes use a mobile mechanic but he's on holiday so can't look at it until the 9th, if I think I've got the housing back right and have time I may test my skill level...
Mustang-owner
Donor
Well, good for you if you do decide to have a play and test your skill level.
Pity you're not a little closer as I'd come and give you a hand.
The AUA isn't very complicated, you just need a "bit of bottle".
The cambelt change on an AUA is the easiest of the A2 engines to work on, but even so, you do need to have confidence as well as some decent tools.
The bolts for the camshaft cover are:
11 x Part No. N 102 475 04 @ £0.71
4 x Part No. N 103 008 05 @ £0.86
Prices are per bolt and excluding VAT.
Here's another PDF you might find useful.
View attachment camshaft housing AUA.pdf
Good luck, and let us know if you need any more info.
Cheers
Jeff
Those bolts, are they stretch ones?
Check the last page of Jeffs PDF attachment.
It shows the torque plus angle settings which indicates they are stretch bolts. (as you probably know)
Cheers Spike
need advice before I can continue
So, very slowly got the housing back down going turn at a time on the bolts. Have set timing on crank and cam pulleys, removed belts apart from cam link as that can come off once the housing is off.
Ready to take housing off (correctly) this time but have just read this and want it confirmed: http://workshop-manuals.com/volkswa...g_and_installing_camshaft_housing/installing/
It is the part "It is a prerequisite that the pistons are NOT at TDC"
It was not mentioned in the removal section, so do I take the housing off then turn the crank so that all are at mid-stroke?
Then once housing is back on, turn the crank to re-align to TDC on 1 again?
EDIT:
Got bored waiting so went ahead and took it off TDC.
Removed housing and saw a grey liquid pooled in the back left 3, didn't have smell or feel of petrol so that would only leave water. How would water get in there? Just had a fear that it's getting in from the cylinder head? If that's the case this car could be heading for car heaven.

Last edited:
bretti_kivi
Member
G12, G12+, G12++ and G13 are all pink / purple.
Is the car outside? Possible some rain got in at some point?
- Bret
Is the car outside? Possible some rain got in at some point?
- Bret