Hello all,

After a very relaxed and fun-filled morning of family board games and grazing on festive nibbles we were talking about last Christmas. Turns out that this time last year I was itching to get outside to tinker in my new A2. I’ve also missed this vehicles ownership birthday which was 4 days ago.

You can probably all remember that this was quite a sorted A2 at the time of purchase, but how it’s come on in the last 12 months.

The initial look was this:

IMG_8411.jpeg


IMG_8412.jpeg


IMG_8413.png


Since then it’s had quite a few areas unnecessarily addressed to make it look the way it does today.

First up was a complete Swing interior removal to make way for a complete Soul interior. To name a few other things that have been replaced along the way: It’s had the dashboard swapped and is on its 3 set of seats. It also sits on its fourth set of wheels. Currently on its fourth climate control panel. It has been controlled by 3 different steering wheels and had 3 different instrument clusters (awaiting a fourth). It’s even on its third registration number!

So many things have been upgraded during my ownership all at my own hand: double DIN dashboard transplant, 8Y FBMFSW retrofit, heated seat retrofit, heated alcantara seats, A6 C5 armrest, full A3 infotainment suite retrofit, rear PDC retrofit, headlamp washer bumper retrofit, twin boot light modification, 12v boot socket retrofit, dual tone horn retrofit, countless door card swaps with different door card armrests, headlamps replaced, JDD gearbox, full winter pack retrofit, rear speaker retrofit, DIS retrofit, Bose retrofit, auto wiper rain sensor, Votex kit and so so much more.

IMG_8416.jpeg


This A2 has become such a special vehicle but the works haven’t finished yet. I still have to reupholster the headlining (colour change), retrofit SideGuard and retrofit rear electric windows. Plenty to keep my busy in 2024.

There is also an exterior look I need to address but will hopefully report back on that topic in the next week or 2!

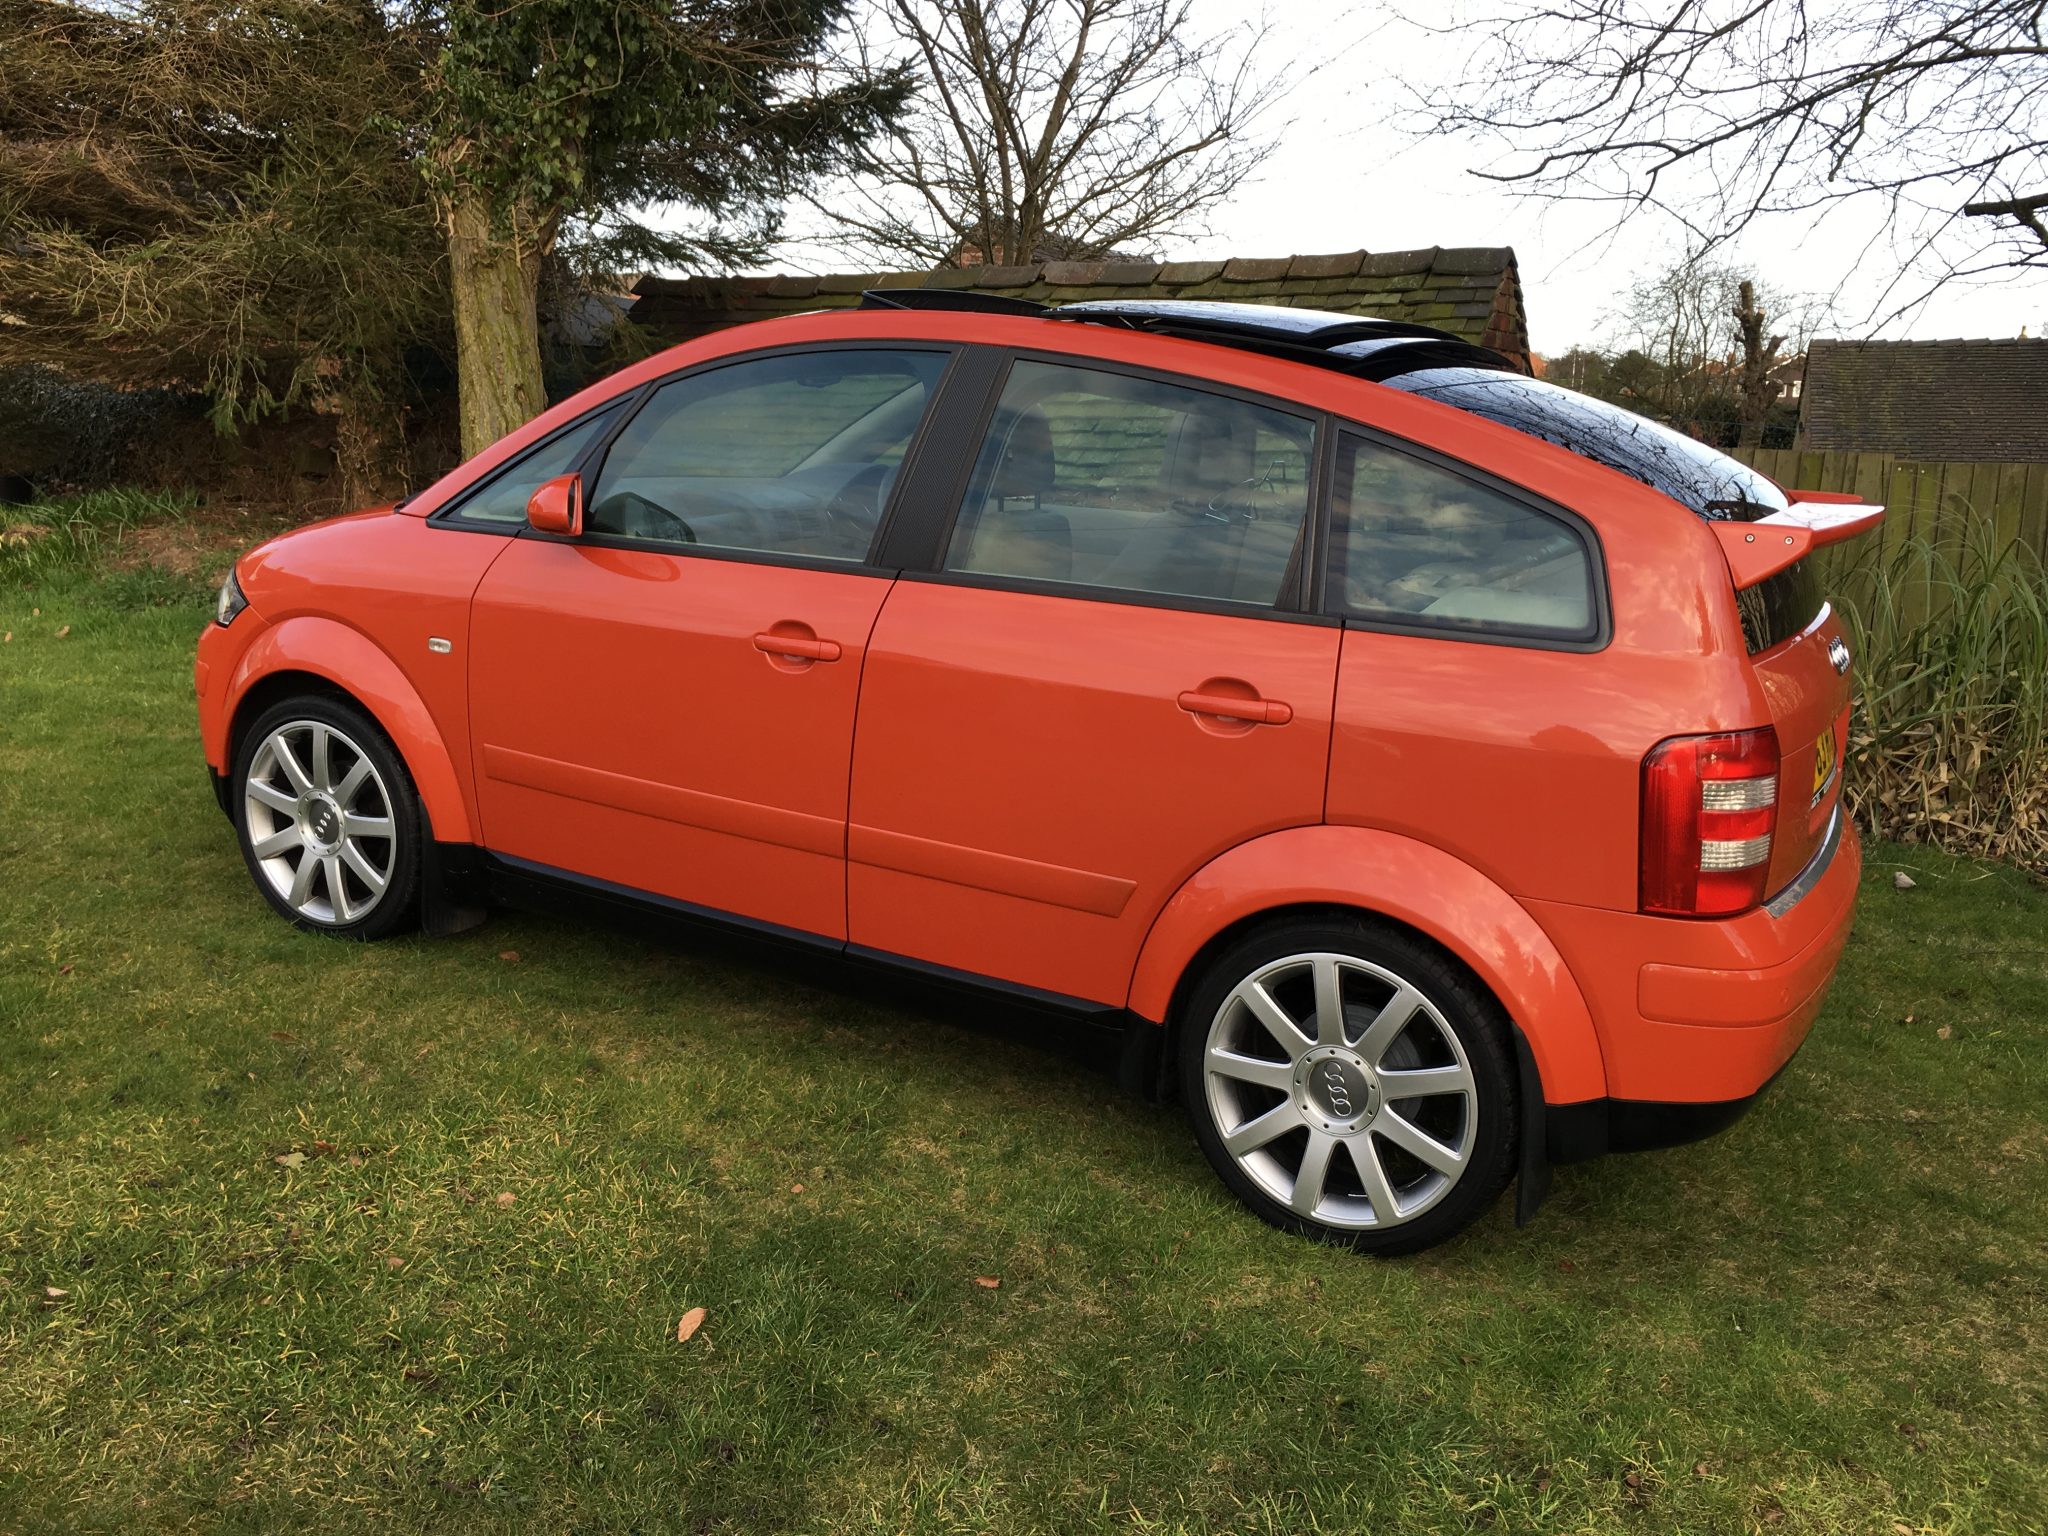
Here’s a reminder of how it looks today:

IMG_8376.jpeg


IMG_8375.jpeg


The main thing letting the exterior look down is the spoiler:

IMG_8415.jpeg


Watch this space as the search is pretty much over. I’ll provide more details in next week or so.

Kind regards,

Tom
 
Morning all,

Just a quick update regards my factory standard spoiler. During a previous ownership it looks to have received a few chip along the rear edge:

IMG_8408.jpeg


The 5 imperfections are circled below but you’ve probably already seen them above:

IMG_8409.jpeg


Boxing Day see me outside with the filler followed by sanding it to a perfectly smooth finish yesterday morning:

IMG_8423.jpeg


After that the vehicle was relocated from my driveway to a neighbours garage to get 3 layers of primer applied. After that had set for a few hours I cleaned everything down again and went forward with about 10 fine coats of Satin Black.

Picked the car up earlier to be presented with a rather nice finish which I’m very happy with considering the conditions I was painting in yesterday. You don’t realise how breathable garages can be until the wind is gusting outside.

IMG_8427.jpeg


IMG_8431.jpeg


IMG_8432.jpeg


IMG_8433.jpeg


Disregard the tiny dark spots/dots as this is just moisture/droplets from the hedge to the right of the car after the wind picked up as I was taking pictures, typical!

Kind regards,

Tom
 
Happy to disregard the odd moisture spot Tom, but I can't help noticing that there's rather a lot of Jaipur Red going on in those photos ;) Well done sir!
 
Happy to disregard the odd moisture spot Tom, but I can't help noticing that there's rather a lot of Jaipur Red going on in those photos ;) Well done sir!
Morning Ian,

You know my thoughts on the only thing that looks better than 1 Jaipur Red A2 on the driveway is 2 Jaipur Red A2s on the driveway.

Unfortunately though, this is not my vehicle. It’s parked up here whilst I assist someone with a couple of things, sadly it’ll be collected in the coming days after it festive holiday at 2work Towers. Does make me want another one though but have also got my eye on a factory White TDI, when does it stop!

Kind regards,

Tom
 
Morning all,

Just a quick update regards my factory standard spoiler. During a previous ownership it looks to have received a few chip along the rear edge:

View attachment 116951

The 5 imperfections are circled below but you’ve probably already seen them above:

View attachment 116952

Boxing Day see me outside with the filler followed by sanding it to a perfectly smooth finish yesterday morning:

View attachment 116953

After that the vehicle was relocated from my driveway to a neighbours garage to get 3 layers of primer applied. After that had set for a few hours I cleaned everything down again and went forward with about 10 fine coats of Satin Black.

Picked the car up earlier to be presented with a rather nice finish which I’m very happy with considering the conditions I was painting in yesterday. You don’t realise how breathable garages can be until the wind is gusting outside.

View attachment 116954

View attachment 116955

View attachment 116956

View attachment 116957

Disregard the tiny dark spots/dots as this is just moisture/droplets from the hedge to the right of the car after the wind picked up as I was taking pictures, typical!

Kind regards,

Tom
Looks a terrific finish Tom 👍
 
Great finish there, more than good enough Tom. What paint is required for this job? Plastic or normal metal paints? I've never understood what material the alien spoiler material is
 
Morning all,

Just a quick update regards my factory standard spoiler. During a previous ownership it looks to have received a few chip along the rear edge:

View attachment 116951

The 5 imperfections are circled below but you’ve probably already seen them above:

View attachment 116952

Boxing Day see me outside with the filler followed by sanding it to a perfectly smooth finish yesterday morning:

View attachment 116953

After that the vehicle was relocated from my driveway to a neighbours garage to get 3 layers of primer applied. After that had set for a few hours I cleaned everything down again and went forward with about 10 fine coats of Satin Black.

Picked the car up earlier to be presented with a rather nice finish which I’m very happy with considering the conditions I was painting in yesterday. You don’t realise how breathable garages can be until the wind is gusting outside.

View attachment 116954

View attachment 116955

View attachment 116956

View attachment 116957

Disregard the tiny dark spots/dots as this is just moisture/droplets from the hedge to the right of the car after the wind picked up as I was taking pictures, typical!

Kind regards,

Tom
What filler and primer did you use Tom?
 
Looks a terrific finish Tom 👍
Hello Keith,

Hope all is well and thank you for the kind words Sir. Yes it’s quite a nice finish considering the conditions I was working in yesterday. Sure I could have achieved a perfect finish if it wasn’t such a draft in the garage but still a happy with what was achieved.

Kind regards,

Tom
 
Great finish there, more than good enough Tom. What paint is required for this job? Plastic or normal metal paints? I've never understood what material the alien spoiler material is

What filler and primer did you use Tom?

Hello Edd and Simon,

Thank you very much. Here’s the products that I used which I picked up from the local Halfords:

IMG_8435.jpeg


In addition to the above items was of course some 600, 800, and 1200 grip wet sand paper. Decent masking tape helps as the cheaper tape can start to lift and come away as you pass by with the heat gun/hair dryer. I also covered the rear of the car with cheap ScrewFix dust sheeting from a roll I had in the garage from a previous DIY task in the kitchen.

As for suitability for the task, I used the very same products many years ago on my first A2 as the spoiler was also untidy. The paint finish remained perfect for a few years then the car unfortunately went to the crusher after purchasing a certain Azure Blue A2.

Hope this helps.

Kind regards,

Tom
 
I've never understood what material the alien spoiler material is
Hello again Edd,

Apologies for not fully answering your question earlier. Whilst I had the Dremel out to open up the 5 imperfections, the material looked to be fibreglass. Not sure if it’s fibre glass all the way through though or if it’s fibre glass layered on top of a tougher material.

The product I used was a generic Halfords paint for application on most surfaces which is just fine for the factory spoiler.

Kind regards,

Tom
 
Evening all,

I know the the most recent addition to this beautiful A2 has been mentioned on other threads this evening but feel it right to document a few words and pictures on this dedicated thread. Certainly as it's the post contains the belated (10 days) first year ownership birthday present.

The background, which is no surprise, is that I’ve been after a rare Votex spoiler for some time now and have attempted a few different approaches to achieve the exterior finish I was hoping for.

First up was simply liberating the reproduction spoiler from the Azure Blue OEM A2 but after recalling how much windscreen adhesive I used at the time of fitting made it a no-go unfortunately, that is never coming off without inflicting damage. The next option was to understand what might be available within the community via 2x wanted threads, which didn’t present anything solid unfortunately. Another consideration was to make my own like Iain @ICowie and Bob @Jellybean have successfully achieved. I was quite happy to take on such a task which I may well do anyway to assist the wider community. I'll not being performing the DIY method though as have found a reasonably local-to-me company that can do great things with acrylic and various density plastic sheets. I'll be approaching the company when they open in the next week or so. Maybe a future Group Order in 2024!

Whilst all these options were running concurrently I was also in communications with Neil @nee777.a2, who I knew had a factory Votex spoiler on his cherished and absolutely stunning Jaipur Red A2. I offered various packages to tempt him so allow me to conduct a tailgate swap. After some discussion we agreed on a deal which put a smile on both our faces.

Ahead of the agreed meet up with Neil, which was only confirmed last week, left me requiring to address my untidy standard spoiler which is why I was on the driveway with the filler on Boxing Day. Trying to squeeze these remedial works in was quite a tall order as the weather wasn’t on my side and the garage where I conducted the paint job couldn't have the door shut due to boxes upon boxes in there, not even enough room for an A2 but had to be made presentable quickly though as the agreed date to conduct the tailgate exchange was quickly approaching. With plenty of elements against me I actually achieved a brilliant finish so we went ahead with the planned and agreed date for the swap. Well that date was today, once again regardless of the prevailing conditions it went ahead without issue.

2x tailgate removed followed by the 2x tailgate refitted in a few hours with many brew stops and continual conversation, oh and a delicious bacon and egg butty!. Some might consider this a long time but honestly I could have been on Neil's driveway all day as it was a complete pleasure to be in his company. Neil your hospitality, conversation and generosity was much appreciated today. You know I’ll return the favour one day I’m sure!

So in the last 5 days the rear end of this Jaipur Red dream of a car has changed somewhat:

26 Dec - Untidy standard spoiler
IMG_8408.jpeg


27 Dec - To a filled and sanded spoiler
IMG_8423.jpeg


28 Dec - Transitioning to a lovely fresh satin black spoiler
IMG_8427.jpeg


30 Dec - Then suddenly today having so spoiler at all
IMG_8448.jpeg


30 Dec - This was quickly addressed though
IMG_8449.jpeg


Hope you agree that it now looks utterly amazing, if there was ever a perfect colour for a full Votex kit then it has to be Jaipur Red. Other colours accepted of course!

All that's needed now is to wait for a gap in the clouds, wash and polish the coachwork to get a series of exterior pictures to you. Here's a couple I took earlier this evening once back at home:

IMG_8454.jpeg


tempImageTFbpjH.jpg


tempImageGPMXWm.jpg

I'll add further pictures in the coming day

Along the way I've had a helping hand by fellow members who deserve a mention: Steve @A2Steve and David @devans who both provided some encouraging tips for the tailgate removal. Turns out there wasn't much to be anxious about at all as it's actually quite a straight forward process, something I'd happily do again but preferably in nicer weather! What's also important is a second pair of hands that are definitely required, this assisting role was perfectly performed by Neil today who I must thank so much for allowing me to get my tools near his cherished A2 and for enabling this transaction to fruition.

I'm over the moon with the outcome of the short road trip this morning, which actually started perfectly as I see the DIS present me with a reading of 4 degrees centigrade... Yes the Webasto fired up all by its self. Such a brilliant heating enhancement. Also got Neil's Webasto running whilst on his driveway with a series to output tests and test runs.

Thats all for now folks.

More to follow as I've got a few other things to update you on.

Kind regards,

Tom
 
That looks amazing Tom.
I suppose the tricky bit was the wiring.
Hi John,

Believe it or not, it was an easy task. All the looms to the heated screen, radio antennas, boot lock, number plate lights , tailgate open button and the brake light were all on display to unplug. The only pain was the white push-in cable tidies as removing them took a little while. I’d happily do it again as doing 2 at the same time gave me great experience very quickly. The second pair of hand s are essential for finally withdrawing the 4x hinge bolts.

Kind regards,

Tom
 
Great stuff, I thought it woud take a lot longer to find one of those! And to get one in jaipur is insane luck!!
Did the donor car have the votex skirts or just the spoiler?

Shane there's no guide to tailgate swapping on here...yet?!..

Found this image or your whiteline research.

Hello Edd,

Honestly there is no need for a guide as it was quite self explanatory what was needed once I removed the tailgate trim panels. After having these trims all of in the past I hadn’t actually looked at how the looms were laid out and was expecting it to be an utter nightmare this morning.

Clearly turned out to be easy. That said if you ever need one swapping then I’d do it for you if you swap OEMs Webasto, haha.

Edit: Neil’s donating A2 didn’t have the remainder of the Votex kit. Here’s his lovely vehicle in some of its glory before todays exchange:

IMG_8459.png


IMG_8457.png


IMG_8460.png


In all honesty it looks better without the Votex spoiler as the Jaipur Red colouring disrupted the flow of the dark glassed top of the car.

Kind regards,

Tom
 
Last edited:
Hello Edd,

Honestly there is no need for a guide as it was quite self explanatory what was needed once I removed the tailgate trim panels. After having these trims all of in the past I hadn’t actually looked at how the looms were laid out and was expecting it to be an utter nightmare this morning.

Clearly turned out to be easy. That said if you ever need one swapping then I’d do it for you if you swap OEMs Webasto, haha.

Edit: Neil’s donating A2 didn’t have the remainder of the Votex kit. Here’s his lovely vehicle in some of its glory before todays exchange:

View attachment 117075

View attachment 117076

View attachment 117077

In all honesty it looks better without the Votex spoiler at the Jaipur Red colouring disrupted the flow of then dark glassed top of the car.

Kind regards,

Tom
Was that the wom car from years ago?
Would be more than happy to donthe webasto, I love spannering. It's electrics I hate :)
 
Was that the wom car from years ago?
Would be more than happy to donthe webasto, I love spannering. It's electrics I hate :)
Hi Edd,

Absolutely yes:


I’d happy assist with any electrical work or retrofits you require in exchange for some of your spanner skills. Maybe a driveway meet up at some point once we have a list of things that need tackling. You know I’m more than happy to help out where I can.

Kind regards,

Tom
 
Morning all,

Although not the best weather, seems to be the theme right now, I managed to a mild shine on the coachwork to grab a few pictures:

Front
IMG_8473.jpeg


Front left
IMG_8470.jpeg


Front right
IMG_8467.jpeg


Here’s the shots that puts a massive smile on my face:

Left
IMG_8469.jpeg


Right
IMG_8466.jpeg


Rear
IMG_8472.jpeg


Rear left
IMG_8471.jpeg


Rear right
IMG_8468.jpeg


Still buzzing after yesterdays tailgate exchange!

Kind regards,

Tom
 
Hi Edd.

I’m sure the other driver here will have something to say about another project… But it’ll happen.

Yes I’m so glad that I’ve been able to complete all that’s been done so far at my own hand. It’s been an enjoyable and rewarding learning process along the way which has saved opening my wallet for installation fees. This has of course resulted in my wallet being thicker to obtain the more expensive purchases.

This A2 really is turning out to be a rather nice example and is pretty much over taken the Azure Blue OEM A2 in terms of specification.

Kind regards,

Tom
 
Last edited:
Back
Top